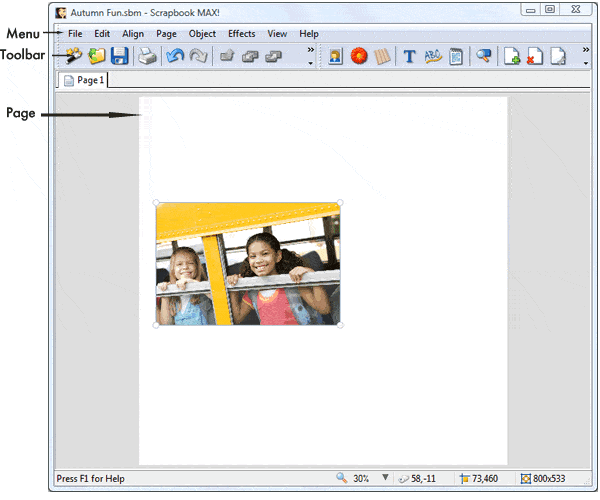
Below is a sample shot of the design space where you will create your scrapbook. You’ll find that its features are intuitive and easy to use. To get you acquainted quickly with Scrapbook MAX! and start learning how to layout a page, we’ve labeled the basic components of the design space and explained them below.
Menu
At the top of the design space, you will find a list of menu commands (File, Edit, Align, Page, Object, etc.)—this is the program menu. When you click on one of these menu commands, a dropdown list of options will appear. You can then click on one of the options to select it.
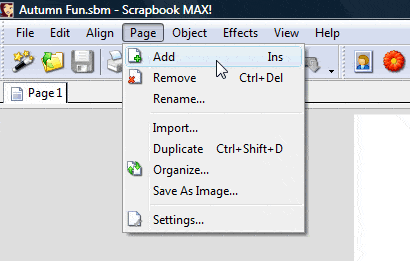
For example, if you click on “Object” on the menu, the following dropdown list will appear:
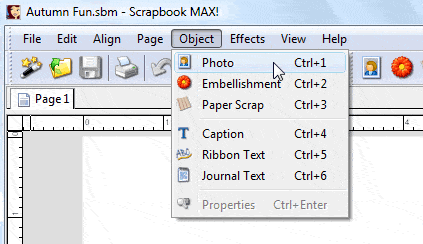
(Some menu options expand into “sub-menus” when you select them or hover the mouse over them. For example, the Edit > Select menu is like this.)
Take a minute to click on the various menu commands and have a look at the options that appear in their lists. Don’t worry if you don’t understand all of the options yet—we will be looking at them in more detail in the following sections.
Keyboard Shortcuts
Some menu commands can also be performed using the keyboard. Whenever there is such a “keyboard shortcut” for a menu command, the combination of keys you need to press in order to activate it will appear next to the command in the menu. For example, in the dropdown list for the Object menu, you can see that you can press “Ctrl+1” to add a Photo object. (This means to hold the Ctrl key down and then press the 1 key.)
Toolbar
Below the menu, you will find a row of icons—this is the toolbar. The icons that you see do many of the same things as the commands in the menu. For instance, in the example above, we clicked on the Object menu and were given a dropdown list of the different objects available in Scrapbook MAX! (Photo, Caption, Journal Text, Embellishment, etc.). You can choose those same objects by clicking on their icon on the toolbar. For instance, the flower-shaped icon is the Embellishment icon. Clicking on it will present you with a variety of embellishment designs to use in your project.

To find out what the other icons on the toolbar do, simply hover over the icon with your mouse pointer. A “tooltip” that describes its functions will appear.
Note: You can think of the toolbar as shortcuts to the most common commands found in the menu. Many people find the toolbar to be a quicker alternative to the menu and its dropdown lists. In the end, you can use the menu, the toolbar, or a combination of both and achieve the same results. The way you choose to use the design space is entirely up to you.
Pages
The large blank area that takes up most of the design space is called a “page.” This is where you will lay out your photos, embellishments, journal text etc. when you create your scrapbook.
Note: Since you are making a scrapbook you will eventually want to insert additional pages into your project as you go along. We’ll show you how to do that in Chapter 4. But for now, we’ll start out working with a single page, to get you comfortable with the features of Scrapbook MAX!.
By default, the pages in a Blank Scrapbook are 8 inches wide by 8 inches tall (a.k.a. Regular Scrapbook 8 x 8 inches). This is standard size for scrapbooking that is easy to print out on most home printers. You’ll notice, however, that you can create pages in a variety of sizes for interesting scrapbook possibilities.
In other words, you aren’t limited to the default size. You can make your pages 4×6, 8×10, 10×10, 12×12…or any custom size you want. You can even mix and match your page sizes within a single scrapbook.
To change the page size, choose Page > Settings, click on the Size tab, and either choose one of the size Presets, or adjust the settings directly.

