Finally had the chance to play with the new Version 2 (available for sale now here at Scrapbook Max)
As some of you know - I think the biggest feature of the new version is the erasor tool - a much needed addition that has many of us all a buzz over. LOL Including myself.
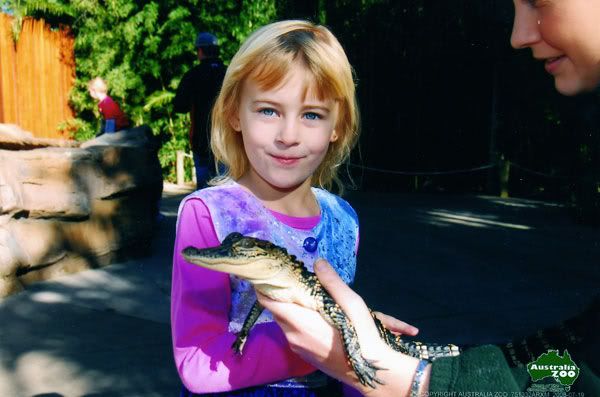
Here is a photo I extracted of Caitlyn - taken at Australia Zoo - July 2008 while on holiday, and yes - it's real. LOL
1. Extracting takes alot of time and effort and practise but is well worth the effort in the end. Remember to save it "Save As" and name appropriate - so you can re-open it again and use for future layouts time and time again.
2. To start - start on a new page - don't try to do layout and extraction all at the same time. Do the extraction first and save it for future use first. I found this best.
3. When you open your photo to extract - make it as big as you can on the page - so you can see it easy. A small photo will be very hard to see when extracting as I don't think you can enlarge the pop up box when it opens (unless you change your screen settings on computer perhaps). So make it super big - you can size it down later.
4. Use the hard brush first and make it large to remove all the easy large parts of your photo first. My settings: 200 px in size - 0 softness - 0% transperancy. It's fast and easy part.
5. After that you need to go smaller - maybe about 80 px (depends on your photo of course) and erase a little closer to your image but not touching.
6. go smaller still - about 50 and get closer still. Now it depends on your image - has it got soft lines like hair or hard lines like a box. Hard straight lines you can keep your erasor set at Hard edge but for hair you need to start using a softer brush size - about 30% (depends on your photo again).
7. keep erasing and working on it getting closer and closer to your edges. Remember if you have a straight line you can hold down the shift key and click and then move right to the end of the straight area and click again - it removes everything inbetween in a perfect straight line.
8. For soft hair areas - you will need to use soft brush. For this photo on the sides at the bottom of her hair - it had some background showing through the hair which was dark. To leave the dark area there would look aweful - so us the soft brush with a semi transparent brush (perhpaps about 30% transparency) REMEMBER it's better to work slowly than to rush it. To hit the undo button will undo the entire thing back to original image and when you have been working on it for some time that is disaster. To avoid this I guess you would need to continually save it and then reopen again.
9. If you work with transparent brush - you can always keep going over these tricky little areas - remember - Take your time. Don't rush it - it might seem like a long time but after you save it, then you have it forever.
Ok another thing I did notice - when erasing you can use scroll and it will save the brush size for you up or down on the last area you clicked on - size, softness or transparency. (you will see the slider move for you)
also if you hold down the ctrl button - and scroll - it changes the softness of the brush. These are some shortcuts for "working on the fly" as they call it - not having to click and leave image.
also by holding down Alt button and scroll - it will adjust the last command you clicked (whether it was softness, transparency or size). It can take some time getting used to this function - but can be quite useful when you are used to it.
Please take a really good look at this extraction - it's pretty good but not what I would call perfect and took me about 10 minutes. I can of course reopen it again later and work on it again to refine the edge details better. I can take away but I can't put anything back. This is why I say - take it slow and careful.
Hope this helps everyone out. I hope to do a layout with this soon to show how I might use it. Oh and at the bottom - it was cut off photo (not full lenght) so I used a soft brush with semi transparency just to erase around the bottom edge to affoid those hard lines.
Love to hear your comments and your findings and of course I'm looking forward to seeing your layouts. Good luck everyone and enjoy.
Hugs from Carena

original photo

As some of you know - I think the biggest feature of the new version is the erasor tool - a much needed addition that has many of us all a buzz over. LOL Including myself.
Here is a photo I extracted of Caitlyn - taken at Australia Zoo - July 2008 while on holiday, and yes - it's real. LOL
1. Extracting takes alot of time and effort and practise but is well worth the effort in the end. Remember to save it "Save As" and name appropriate - so you can re-open it again and use for future layouts time and time again.
2. To start - start on a new page - don't try to do layout and extraction all at the same time. Do the extraction first and save it for future use first. I found this best.
3. When you open your photo to extract - make it as big as you can on the page - so you can see it easy. A small photo will be very hard to see when extracting as I don't think you can enlarge the pop up box when it opens (unless you change your screen settings on computer perhaps). So make it super big - you can size it down later.
4. Use the hard brush first and make it large to remove all the easy large parts of your photo first. My settings: 200 px in size - 0 softness - 0% transperancy. It's fast and easy part.
5. After that you need to go smaller - maybe about 80 px (depends on your photo of course) and erase a little closer to your image but not touching.
6. go smaller still - about 50 and get closer still. Now it depends on your image - has it got soft lines like hair or hard lines like a box. Hard straight lines you can keep your erasor set at Hard edge but for hair you need to start using a softer brush size - about 30% (depends on your photo again).
7. keep erasing and working on it getting closer and closer to your edges. Remember if you have a straight line you can hold down the shift key and click and then move right to the end of the straight area and click again - it removes everything inbetween in a perfect straight line.
8. For soft hair areas - you will need to use soft brush. For this photo on the sides at the bottom of her hair - it had some background showing through the hair which was dark. To leave the dark area there would look aweful - so us the soft brush with a semi transparent brush (perhpaps about 30% transparency) REMEMBER it's better to work slowly than to rush it. To hit the undo button will undo the entire thing back to original image and when you have been working on it for some time that is disaster. To avoid this I guess you would need to continually save it and then reopen again.
9. If you work with transparent brush - you can always keep going over these tricky little areas - remember - Take your time. Don't rush it - it might seem like a long time but after you save it, then you have it forever.
Ok another thing I did notice - when erasing you can use scroll and it will save the brush size for you up or down on the last area you clicked on - size, softness or transparency. (you will see the slider move for you)
also if you hold down the ctrl button - and scroll - it changes the softness of the brush. These are some shortcuts for "working on the fly" as they call it - not having to click and leave image.
also by holding down Alt button and scroll - it will adjust the last command you clicked (whether it was softness, transparency or size). It can take some time getting used to this function - but can be quite useful when you are used to it.
Please take a really good look at this extraction - it's pretty good but not what I would call perfect and took me about 10 minutes. I can of course reopen it again later and work on it again to refine the edge details better. I can take away but I can't put anything back. This is why I say - take it slow and careful.
Hope this helps everyone out. I hope to do a layout with this soon to show how I might use it. Oh and at the bottom - it was cut off photo (not full lenght) so I used a soft brush with semi transparency just to erase around the bottom edge to affoid those hard lines.
Love to hear your comments and your findings and of course I'm looking forward to seeing your layouts. Good luck everyone and enjoy.
Hugs from Carena
original photo


Comment