 Tweet
Tweet
Hi everyone.
I have a great challenge for you this month and it involves doing extractions using the Eraser tool in SBM Version 2. Now I didn't say it was going to be easy but that's what I'm here to do - CHALLENGE YOU.
Challenge:
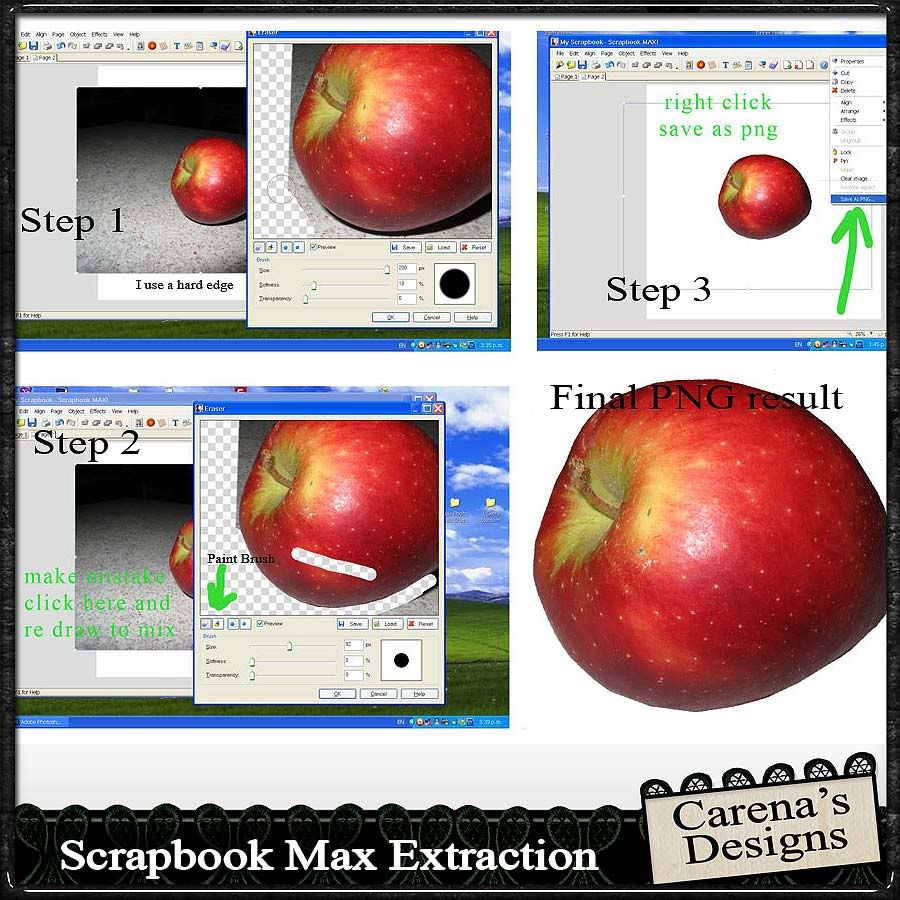
1. Take a photo of something easy to extract. By this I mean something simple with square or rounded edges. In my example I went for an apple (basic round shape).
2. Extract the item you choose and save it as a PNG.
3. Scrap a layout using your extraction.
Here is a few pictures of the process.
Step 1 - My example of an apple. - Keep it a simple image without too many edges. You can move on to more complicated items once you have mastered it.
I would ususally go for a hard edge brush - that is slide the softness slider to the far left. You can see the black dot on the right edges change to much harder for defined edge rather than fuzzy. Pick the size brush that best fits your image. In my case this image of the apple is extremely big so I used the biggest brush size 200 px.
Slowly start working your way around the image and rub out.
To get the very large close up as I did use the Alt and Scroll button on mouse to zoom in. To get the best results its best to zoom in very close.
Hold the SHIFT button down as you click around the image will give you a straight line from your last click to the next. For the apple I used very small movements or I'd get a apple with square sides. LOL.
Step 2: Shows a mistake - OH NO - I went in the wrong place - Well no problem use the Paint Brush (shown) and rub back over where you didn't want to erase and it magically re-appears. To continue - don't forget to click back on the eraser again.
You can click OK and it will take you out of the erasor screen and back to your image. You can click again and continue again but I don't think you can correct a mistake then. Any corrections must be done while in the erasor screen before exit.
Step 3: After you have finished - I had my apple selected and right click and look for "SAVE AS PNG". Save it onto your computer naming and placing it somewhere you will remember where it is. Remember to keep the file name with .png on the end or it won't save right.
Finally - For the Challenge, I would like you to show your extraction in the gallery in 2 steps. 1st: show your extraction along side the original image. See my example in next post. 2nd I now want you to scrap a layout and include your extracted item (whatever it might be) in the layout. Choose any kit you like - any theme - add a photos or whatever but you must include your extracted item in it somewhere.
3rdly - congratulate yourself for sticking with it and with me. It's a trickly challenge I know but you can be extremely proud of yourself. Now you can look forward to trying this out more often.
p: Shows a mistake - OH NO - I went in the wrong place - Well no problem use the Paint Brush (shown) and rub back over where you didn't want to erase and it magically re-appears. To continue - don't forget to click back on the eraser again.
You can click OK and it will take you out of the erasor screen and back to your image. You can click again and continue again but I don't think you can correct a mistake then. Any corrections must be done while in the erasor screen before exit.
Step 3: After you have finished - I had my apple selected and right click and look for "SAVE AS PNG". Save it onto your computer naming and placing it somewhere you will remember where it is. Remember to keep the file name with .png on the end or it won't save right.
Finally - For the Challenge, I would like you to show your extraction in the gallery in 2 steps. 1st: show your extraction along side the original image. See my example in next post. 2nd I now want you to scrap a layout and include your extracted item (whatever it might be) in the layout. Choose any kit you like - any theme - add a photos or whatever but you must include your extracted item in it somewhere.
3rdly - congratulate yourself for sticking with it and with me. It's a trickly challenge I know but you can be extremely proud of yourself. Now you can look forward to trying this out more often.
Load up to the Design Team Challenge Gallery:
Now the main thing you might all like to extract are people - adults and children. There are many, many stunning layouts in the gallery which have used this technique. You can make some amazing scenes and they'd be fantastic for making your very own fantasy childrens story book with none other than your very own children. Image there delight in reading about themself. Printed into a hard cover book would be a treasured for a life time and imagine reading to the next generation a book with you - that is the childs Mum or Dad in the store.
Example done by experts Kit: By Frog Pond by Carena's Designs - You too can get this good with practice.
This is done my emst (Elaine is well practiced at extraction and she loves to extract her grandchildren. Check out her gallery and be inspired - clicking layout will take you there)

I have a great challenge for you this month and it involves doing extractions using the Eraser tool in SBM Version 2. Now I didn't say it was going to be easy but that's what I'm here to do - CHALLENGE YOU.
Challenge:
1. Take a photo of something easy to extract. By this I mean something simple with square or rounded edges. In my example I went for an apple (basic round shape).
2. Extract the item you choose and save it as a PNG.
3. Scrap a layout using your extraction.
Here is a few pictures of the process.
Step 1 - My example of an apple. - Keep it a simple image without too many edges. You can move on to more complicated items once you have mastered it.
I would ususally go for a hard edge brush - that is slide the softness slider to the far left. You can see the black dot on the right edges change to much harder for defined edge rather than fuzzy. Pick the size brush that best fits your image. In my case this image of the apple is extremely big so I used the biggest brush size 200 px.
Slowly start working your way around the image and rub out.
To get the very large close up as I did use the Alt and Scroll button on mouse to zoom in. To get the best results its best to zoom in very close.
Hold the SHIFT button down as you click around the image will give you a straight line from your last click to the next. For the apple I used very small movements or I'd get a apple with square sides. LOL.
Step 2: Shows a mistake - OH NO - I went in the wrong place - Well no problem use the Paint Brush (shown) and rub back over where you didn't want to erase and it magically re-appears. To continue - don't forget to click back on the eraser again.
You can click OK and it will take you out of the erasor screen and back to your image. You can click again and continue again but I don't think you can correct a mistake then. Any corrections must be done while in the erasor screen before exit.
Step 3: After you have finished - I had my apple selected and right click and look for "SAVE AS PNG". Save it onto your computer naming and placing it somewhere you will remember where it is. Remember to keep the file name with .png on the end or it won't save right.
Finally - For the Challenge, I would like you to show your extraction in the gallery in 2 steps. 1st: show your extraction along side the original image. See my example in next post. 2nd I now want you to scrap a layout and include your extracted item (whatever it might be) in the layout. Choose any kit you like - any theme - add a photos or whatever but you must include your extracted item in it somewhere.
3rdly - congratulate yourself for sticking with it and with me. It's a trickly challenge I know but you can be extremely proud of yourself. Now you can look forward to trying this out more often.
p: Shows a mistake - OH NO - I went in the wrong place - Well no problem use the Paint Brush (shown) and rub back over where you didn't want to erase and it magically re-appears. To continue - don't forget to click back on the eraser again.
You can click OK and it will take you out of the erasor screen and back to your image. You can click again and continue again but I don't think you can correct a mistake then. Any corrections must be done while in the erasor screen before exit.
Step 3: After you have finished - I had my apple selected and right click and look for "SAVE AS PNG". Save it onto your computer naming and placing it somewhere you will remember where it is. Remember to keep the file name with .png on the end or it won't save right.
Finally - For the Challenge, I would like you to show your extraction in the gallery in 2 steps. 1st: show your extraction along side the original image. See my example in next post. 2nd I now want you to scrap a layout and include your extracted item (whatever it might be) in the layout. Choose any kit you like - any theme - add a photos or whatever but you must include your extracted item in it somewhere.
3rdly - congratulate yourself for sticking with it and with me. It's a trickly challenge I know but you can be extremely proud of yourself. Now you can look forward to trying this out more often.
Load up to the Design Team Challenge Gallery:
Now the main thing you might all like to extract are people - adults and children. There are many, many stunning layouts in the gallery which have used this technique. You can make some amazing scenes and they'd be fantastic for making your very own fantasy childrens story book with none other than your very own children. Image there delight in reading about themself. Printed into a hard cover book would be a treasured for a life time and imagine reading to the next generation a book with you - that is the childs Mum or Dad in the store.
Example done by experts Kit: By Frog Pond by Carena's Designs - You too can get this good with practice.
This is done my emst (Elaine is well practiced at extraction and she loves to extract her grandchildren. Check out her gallery and be inspired - clicking layout will take you there)


Comment